Build a Full-Stack Webapp
tutorialon Jun 30, 2025 (created Nov 14, 2024) • 7 min
In this tutorial, we're going to build a webapp to tell users a random joke from a database. We'll also let users add their own jokes to the database.
Prerequisites
First, open Git Bash. If you don't have Git Bash, get it from https://git-scm.com/ .
We also need to make sure we have NodeJS installed. We can test this by running this command in Git Bash:
$ npm --versionIt should give something like 10.2.3. If not get it from https://nodejs.org/ The final tool we need is the Merrymake CLI, which uses Git and NodeJS. Install the CLI with the command:
$ npm install --global @merrymake/cli
Start Using Merrymake
With the CLI installed, we are ready to start using Merrymake. The first command we should run on every device we want to use Merrymake on is:
$ mm startThe mm tool now guides us through the initial process. Select:
setup new key specifically for Merrymake- Input your email address
create new organization- Name your organization or press enter to accept the suggested name
initialize with a basic templatetypescriptdeploy the service immediatelypost an event to the rapids- Input your name (or anything)
- Input
admin key - Press enter to accept the suggested duration (
14 days)
We should now see Hello, XXXX!, this means our service is running in the cloud. If you don't see this please reach out on our Discord to get assistance.

Connect a Database
We are ready to add a database to our back end. We navigate into the repository we just created with the command:
$ cd [organization name]/back-end/service-1Head over to MongoDB and create a free MongoDB database. We need to allow all IPs to be able to access the cluster so head to Network Access under the Security tab. Add a new IP and allow access from wherever. Head back to the database and copy the connection string. We put this URI in a secret environment variable with the command:
$ mm envvar- Input
DB the value is secret- Insert the connection string
accessible in both prod and init run
We need to install an npm package to work with the database:
$ npm install mongodbSetup collections in the init run
The 'init run' runs exactly once; on deployment. Thus, the init run is perfect for setting up database collections. We need one document joke with one attribute joke. Open the file index.ts and replace its content with this:
back-end/service-1/index.tsimport {
  merrymakeService,
  MIME_TYPES,
  replyToOrigin,
} from "@merrymake/service";
import { MongoClient } from "mongodb";

async function handleHello(payloadBuffer: Buffer) {
  let payload = payloadBuffer.toString();
  replyToOrigin(`Hello, ${payload}!`, MIME_TYPES.txt);
}

merrymakeService(
  {
    handleHello,
  },
  async () => {
    if (process.env.DB) {
      const client = new MongoClient(process.env.DB);
      try {
        await client.connect();
        await client.db("Merrymake").createCollection("joke").then();
      } finally {
        await client.close().then();
      }
    } else {
      console.log("Environment variable DB is not defined");
    }
  }
);
Implement the functionality
Our back end has three operations: retrieveOne, retrieveAll, and insert. First, we need to set up hooks so we can eventually trigger the functions. Go into the merrymake.json file and replace its content with this:
back-end/service-1/merrymake.json{
  "hooks": {
    "main/retrieveOne": "handleRetrieveOne",
    "main/retrieveAll": "handleRetrieveAll",
    "main/insert": "handleInsert"
  }
}
Then, in index.ts we replace the handleHello function with three new functions:
back-end/service-1/index.tsimport {
  merrymakeService,
  MIME_TYPES,
  replyToOrigin,
} from "@merrymake/service";
import { MongoClient } from "mongodb";

async function handleRetrieveOne(payloadBuffer: Buffer) {
  if (process.env.DB) {
    const client = new MongoClient(process.env.DB);
    try {
      await client.connect().then();
      const row = await client
        .db("Merrymake")
        .collection("joke")
        .aggregate([{ $sample: { size: 1 } }])
        .toArray()
        .then();
      replyToOrigin(JSON.stringify(row), MIME_TYPES.json);
    } finally {
      await client.close().then();
    }
  } else {
    console.log("Environment variable DB is not defined");
  }
}

async function handleRetrieveAll(payloadBuffer: Buffer) {
  if (process.env.DB) {
    const client = new MongoClient(process.env.DB);
    try {
      await client.connect().then();
      const row = await client
        .db("Merrymake")
        .collection("joke")
        .find()
        .toArray()
        .then();
      replyToOrigin(JSON.stringify(row), MIME_TYPES.json);
    } finally {
      await client.close().then();
    }
  } else {
    console.log("Environment variable DB is not defined");
  }
}

async function handleInsert(payloadBuffer: Buffer) {
  const payload = payloadBuffer.toString().trim().replace("\\n", "<br>");
  const input = {
    joke: payload,
  };
  if (process.env.DB) {
    const client = new MongoClient(process.env.DB);
    try {
      await client.connect().then();
      await client.db("Merrymake").collection("joke").insertOne(input);
      replyToOrigin("OK", MIME_TYPES.txt);
    } finally {
      await client.close().then();
    }
  } else {
    console.log("Environment variable DB is not defined");
  }
}

merrymakeService(
  {
    handleRetrieveOne,
    handleRetrieveAll,
    handleInsert,
  },
  async () => {
    if (process.env.DB) {
      const client = new MongoClient(process.env.DB);
      try {
        await client.connect();
        await client.db("Merrymake").createCollection("joke").then();
      } finally {
        await client.close().then();
      }
    } else {
      console.log("Environment variable DB is not defined");
    }
  }
);
Now, to deploy the service we simply run:
$ mm deployThe Merrymake platform automatically builds, packages, and deploys the service. Merrymake then executes the init run, and if it is successful, start directing traffic to the new service. Hurray, we have code in production! Now let's run the service.
Interacting with the Rapids
Every execution of our service is triggered by an event on a large queue called the Rapids. We can see the status of executions with the command:
$ mm rapidsFrom here we can see that we have an init event which was successful. We can also drill into specific events to get details, such as what our code printed during execution.
We can also post events to the rapids, to trigger services. Let's try adding a joke by triggering the insert event:
post message to rapids using an api-key- Input insert
attach plain text payload- Input
Why did the chicken cross the road?\nTo get to the other side admin-key (XXXX)
We should see Ok. To verify that the insert worked, we can trigger the retrieveOne like this:
$ mm rapids post retrieveOne empty _Which should return our singular joke from above.

Add a Front End
In Merrymake, we get a free public front end, which we can manage from the front-end folder, let's navigate to this folder:
$ cd ../../front-endReplace the content of the index.html file
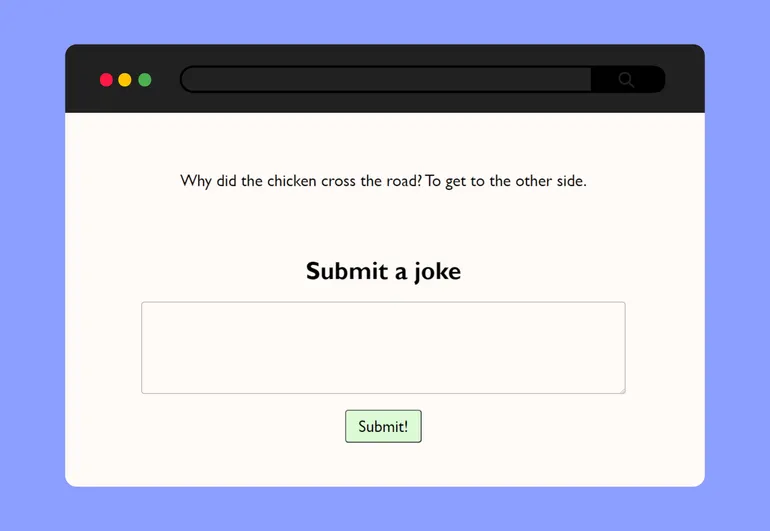
front-end/index.html<html lang="en">

<head>
  <meta charset="UTF-8">
  <meta name="viewport" content="width=device-width, initial-scale=1.0">
  <title>Dad jokes</title>
  <link rel="stylesheet" href="https://cdnjs.cloudflare.com/ajax/libs/font-awesome/4.7.0/css/font-awesome.min.css">
  <link rel="stylesheet" href="styles.css">
</head>

<body>
  <p id="show-joke"><i class="fa fa-spinner fa-pulse"></i></p>

  <div class="spacer"></div>

  <form id="new-joke">
    <h1>Submit a joke</h1>
    <p><textarea id="joke" rows=3></textarea></p>
    <input type="submit" value="Submit!" />
  </form>

  <div id="thank-you">That's really funny 😂</div>

  <script>
    // More to come here
  </script>
</body>

</html>
Also, create a new file style.css containing:
front-end/style.cssbody,
textarea {
  text-align: center;
  line-height: 1.8em;
}

h1 {
  font-size: 40px;
}

body,
.spacer {
  margin-top: 100px;
}

body,
textarea,
input {
  font-family: "Gill Sans", "Gill Sans MT", Calibri, "Trebuchet MS", sans-serif;
  font-size: 27px;
}

textarea,
input {
  border-radius: 5px;
}

textarea {
  width: 800px;
}

input[type="submit"] {
  padding: 10px 20px;
  background-color: #dfd;
}

#thank-you {
  display: none;
}
We can open up the index.html in a browser to see how our front end looks and behaves. Currently, it only shows an infinite loading spinner. So, let's add some functionality.
Get a joke from the back end
We've see how we can trigger the back end from the CLI, during which we setup an "admin key". We can also trigger services via an HTTP request using an API key. Best practice is to use different keys for each event source, so we create another key with:
$ mm keyadd a new apikey- Input
front-end - Input
1 year
It then gives you a key, highlighted in yellow, keep this close at hand.
Using this key, we can add code in the script block to retrieve one joke on startup and replace the spinner with the joke.
front-end/index.html  <script>
    (async () => {
      let resp = await fetch("https://rapids.merrymake.io/[YOUR KEY]/retrieveOne");
      let text = await resp.text();
      document.getElementById("show-joke").innerHTML = text;

      // Even more to come
    })();
  </script>
As we can see, to trigger an event we use the URL https://rapids.merrymake.io/[APIKEY]/[EVENT]
Send a joke to the back end
The only thing missing from our app, is the ability for users to add their own jokes. This works similarly but here we use a POST method, with a content type, and we pass the API key in the header.
front-end/index.html  <script>
    (async () => {
      ...

      let elem = document.getElementById("new-joke");
      elem.addEventListener("submit", async (e) => {
        e.preventDefault();
        let resp = await fetch("https://rapids.merrymake.io/insert", {
          method: "POST",
          headers: {
            "Content-type": "plain/text",
            "merrymake-key": "[YOUR KEY]"
          },
          body: document.getElementById("joke").value
        });
        elem.style.display = "none";
        document.getElementById("thank-you").style.display = "block";
      });
    })();
  </script>
We can test our app locally, and once we are happy with our front end, we run:
$ mm deployOur app is now available to everyone through https://[org].merrymake.app.

Secure the App
Currently, both our keys are universal keys, meaning the keys can trigger any event. Yet, the front end only needs to trigger the insert and retrieveOne events. So, let's narrow the front-end key to allow only those events.
Configuring events
To narrow access, we first need to declare the events. We do this, by going into the event-configuration folder
$ cd ../../event-configurationHere we can replace the content of api.json with this:
event-configuration/api.json{
  "insert": {},
  "retrieveOne": { "waitFor": 2000 }
}
We also configure how long to wait for before timing out and sending back Queued event. Save the file and deploy the event configuration:
$ mm deployAllowlist the events
The final step, is to allow exclusively these events on the front-end key, we do this with
$ mm eventfront-end (XXXXX)- Then check
insertandretrieveOne submit
Notice, how we could not allow the event retrieveAll. This is because we didn't declare it in the event configuration.
To verify that the front-end key can no longer trigger retrieveAll, we run:
$ mm rapids post retrieveAll emptyYou can also try the admin key which is still a universal key, thus can still trigger any event.
Conclusion
Using the CLI we:
- Registered an account and created an organization
- Deployed a back end, the public front end, and the event configuration
- Inspected our Rapids
- Posted events with and without payload to our Rapids
- Set a secret environment variable
- Created two API keys
- Allow-listed events on the
front-endkey
We implemented and deployed a serverless back end with a database and three hooks. Along with a secure public front end.
These are the basic steps to launch a full-stack webapp in Merrymake.